Mass Edit
Mass Edit will edit the information in one field in many individual
records at once, saving the time of touching and changing each record
individually. To accomplish this change, all you need to do is to tell
Church Windows which field you would like to change, whose information
you would like to change, and what the new information should be.
Important!
First, enable "Undo" Mass Edit:
Since Mass Edit has the ability to change so much information so quickly, the system has a very important option available to you. This is the capability to "Undo" a Mass Edit after it has been completed. Before you use Mass Edit, make sure that this option is turned on.
- From The Initial Portal of Church Windows choose Membership
- Click Special Functions in the Button Bar at the top of the screen
- Choose Settings
- On the Membership Settings screen is a box labeled Backup member file before mass edit*
- Verify that this box has a
checkmark
- Then click OK to close the Settings screen
Utilizing Mass Edit
To have Church Windows touch every record during its search, perform a Find without any search criteria to display all records in The Find Grid. You could then
select only specific records to change using checkmarks. For Church Windows to change information in
only a certain group of records, then perform a Find to get this certain group displayed in The Find Grid, and then click Mass Edit: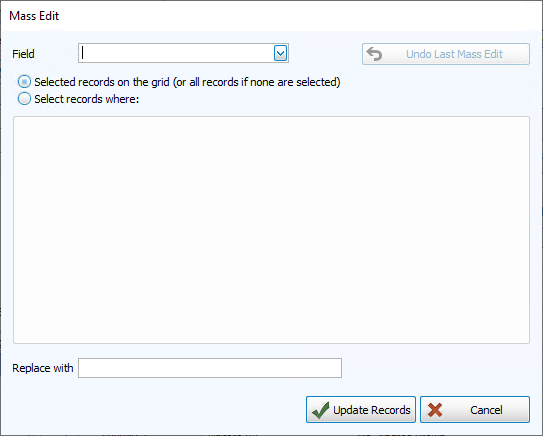
 Place a new value into ALL records
- First, select the field you would like to affect.
In the Field box, click the
 dropdown button, scroll down to the particular field, and click that field.
 - Use the
 radio button to choose Selected records on the Grid (or all records if none are selected)
 - Enter the new value in the Replace With box.
- When you are ready, click Update Records to begin the Mass Edit.
- The system will confirm the changes you are about to make and ask if you would like to continue with the Mass Edit. Answer Yes to continue, No to stop the Mass Edit.
- If you answer Yes,
then the system will make the changes, and then give a message letting
you know how many records it has changed.
- If you click OK
on this message, then the Mass Edit will be completed and the records
will be changed.
- If you click Cancel on this message, then the system will not complete the Mass Edit and the changes will not be made.
- If you click OK
on this message, then the Mass Edit will be completed and the records
will be changed.
Replace an existing value with another value
- First, select the field that contains the information
you would like to change. In the Field
box, click the dropdown button, scroll down to the particular field, and
click that field.
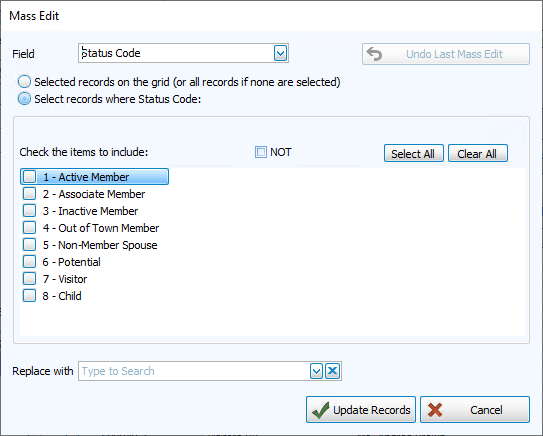
- Select the radio button next to Select records where [Selected Field]:
- Depending on the Field Types selected, you will have different options:
- If the field you have
selected above is a List
field, then you can check the box(es) to select the code(s) to change
in the Select records where [Selected Field]: box. Then, enter the value to be replaced into the Replace With box:
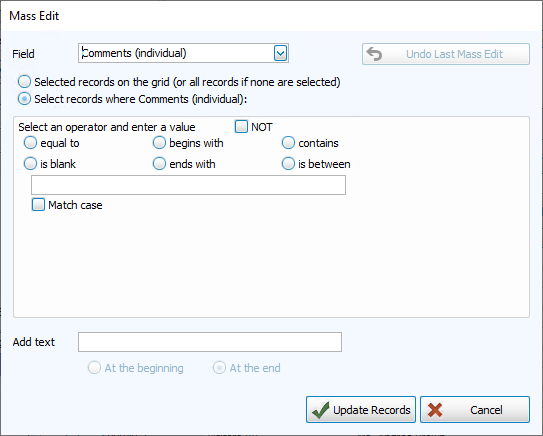
- If it is not a list field, you'll need to "Select an operator" that describes the information you're trying to edit. To have the search be case-sensitive, which means
that information will only match the original information if it is in
the exact same upper- and lower-case format, then check the Match
case box. In the Add text box, enter the new value or click the down arrow and select
"At the beginning" or "At the end" (if applicable):
- If the field you have
selected above is a List
field, then you can check the box(es) to select the code(s) to change
in the Select records where [Selected Field]: box. Then, enter the value to be replaced into the Replace With box:
- When you are ready, click Update Records to begin the Mass Edit or Cancel to discard changes without saving.
- The system will confirm the changes you are about to make and ask if you would like to continue with the Mass Edit. Answer Yes to continue, No to stop the Mass Edit.
- If you answer Yes,
then the system will make the changes, and then give a message letting
you know how many records it has changed.
- If you click OK
on this message, then the Mass Edit will be completed and the records
will be changed.
- If you click Cancel on this message, then the system will not complete the Mass Edit and the changes will not be made.
- If you click OK
on this message, then the Mass Edit will be completed and the records
will be changed.
Place a new value only in fields that are currently
blank
- First, select the field you would like to edit. In the Field box, click the down arrow, scroll down to the particular field, and click that field.
- Select the radio button next to Select records where [Selected Field]:
- Choose the "is blank" operator, or for a List
field check the NOT box and click the Select All button:
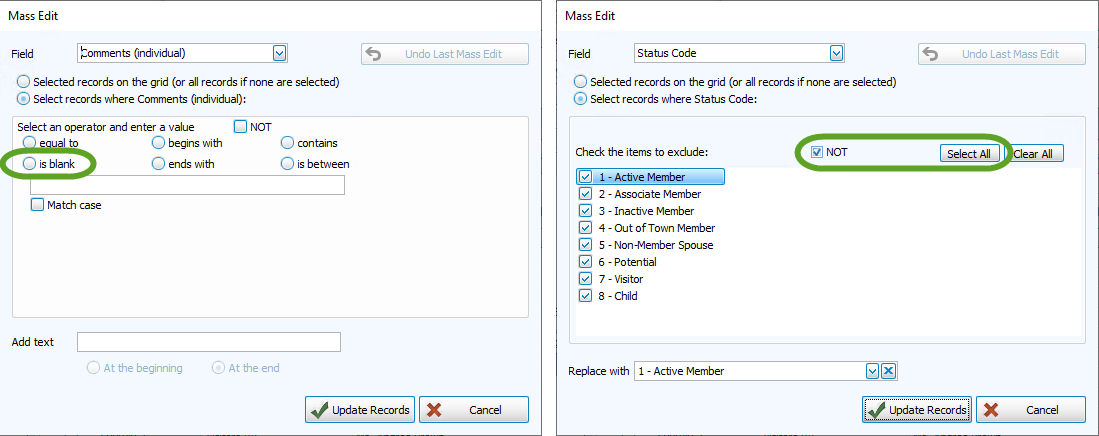
- Enter the new value into the Replace with box.
- When you are ready, click Update Records to begin the Mass Edit.
- The system will confirm the changes you are about to make and ask if you would like to continue with the Mass Edit. Answer Yes to continue, No to stop the Mass Edit.
- If you answer Yes,
then the system will make the changes, and then give a message letting
you know how many records it has changed.
- If you click OK
on this message, then the Mass Edit will be completed and the records
will be changed.
- If you click Cancel on this message, then the system will not complete the Mass Edit and the changes will not be made.
- If you click OK
on this message, then the Mass Edit will be completed and the records
will be changed.
Undo a Mass Edit
With the Backup member file before mass edit* option enabled, the system will begin Making a Backup of your existing Membership data before performing a Mass Edit. That way, after the Mass Edit is finished, if you find that the results are incorrect, you can return to the Mass Edit screen and click the Undo Last Mass Edit button. This will return your data to the state it was prior to the last successful Mass Edit. Since all of the information entered since that Mass Edit will be lost, it is recommended that you carefully check the results of every Mass Edit immediately, so that if you need to you can undo the Mass Edit right away and not risk losing any subsequent changes.
While performing a Mass Edit, the system gives you two different opportunities
to stop, cancel, or otherwise undo the changes it is making:
- After you click Update Records
to start the Mass Edit, the system confirms the changes you are about
to make and asks if you would like to continue:
- If you answer No here, then the Mass Edit will stop.
- If you answer Yes to the above message, then the system will perform the Mass Edit, then bring up a message that tells you how many records it changed.
- If you
click Cancel here, then the
changes will be reversed and the Mass Edit will not be completed.
- If you clicked OK on the above message, then the Mass Edit will complete and the records will be changed.
You do still have another option to "Undo Last Mass Edit" those changes, however this is only available if you set the Membership Settings
screen to Backup member
file before Mass Edit*. If this box does not have a checkmark,
then the Undo Last Mass Edit option will not be available.
To see a specific example of how Mass Edit can be used, see Mass Editing Area Codes.
